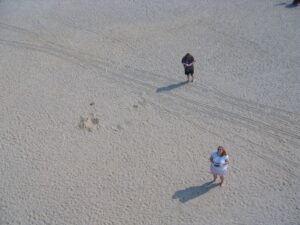
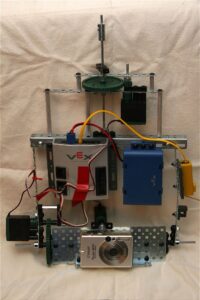
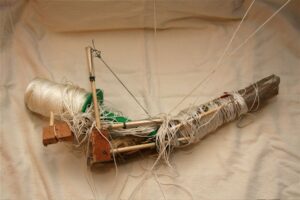
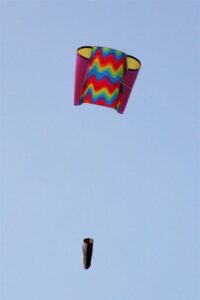
Rob Bender
Me | Resume | Projects | Photography | Photolog | Flickr Photos | Contact

Kite Aerial Photography

Inspired by an article in MAKE Magazine, I wanted to give Kite Aerial Photography (KAP) a try. I originally wanted to start simple with the basic, stationery rig described in the article but using a modified CVS disposable digital camera so I could take photos at a timed interval and not have to bother with film processing. I wasn't having any luck hacking the camera and then I saw a video showing a remote controlled rig built using a VEX Robotics Kit. I found one on clearance at the local Radio Shack.

The most commonly recommended kites for KAP cost $100 or more (the most popular is $200), but for my first try I bought a cheaper, smaller kite for $40 and a plastic spool of kite string. The winds at the Jersey shore are strong enough that I didn't need a huge kite.

I managed to build the rig entirely from parts included in the kit except for two small brackets I bought to hold the sides to the top. I tried to use the lighter pieces from the kit to keep the weight down. I also used multiple gears to give me finer control over the turning. For the picavet suspension that hung the rig from the kite line, I still used the wooden design described in the original article.

The First Try

On August 14th, my wife Christine and I took my camera rig and kite down to Cape May Point State Park in Cape May, NJ. It has a decent sized beach, good winds, and isn't too crowded. There's also plenty to photograph: the lighthouse, the shore, the WWII bunker and the nature preserve.

I brought along the entire kit of parts and various tools in case I needed to make any last minute adjustments or repairs. We flew the kite up about fifty feet before attaching the wooden picavet suspension. I first tested the suspension using a small bag of sand that was probably a little heavier than the metal rig. It bowed a little but held up and the kite was able to lift it, so I hooked up the actual rig and attached the camera to the rig using plastic pull-ties.

The rig went up in the air. Christine operated the remote while I held the spool. She was having a hard time telling where the camera was pointing, but she was able to take a few neat photos:

As I was letting the kite up higher, one of the handles on the spool popped out and the spool was pulled from my hands. I chased it across the beach and grabbed it before it got away. However, the lack of tension on the string caused the kite and rig to descend and the rig had hit the ground. When I grabbed the spool again, the kite ascended and rig went back up, but it was tangled into the line and some of the metal had bent. It was too messed up to take any more photos. I popped the handle back into the spool and as we began to pull the kite and rig back down, the wooden suspension broke. Luckily, a small part of the rig was still tangled in the line so it did not come crashing down to the ground. We quickly pulled in enough line that I could untangle the rig from the line and put it down.

Unfortunately after I detached and put down the rig, the spool broke again and slipped out of Christine's hands. I tried to chase it, but it had already gone over the dunes and inland where there's a large lake, swamp and forest. The kite went across the lake and into the swamp before the line got caught on something. The kite itself was up several hundred feet in the air and the wind was strong enough that it wasn't coming down any time soon.

At this point I gave up on the kite and we took our stuff back to the car. I was ready to give up on kite photography completely, but Christine drove us around the local roads to see if we could get closer to the kite. We found a nature trail and walked it as it twisted and turned through the swamp. We got closer to the kite and eventually spotted the spool and line stuck up in a tree near the trail. I found a long branch and was able to snag the line. I pulled the line down enough that Christine was able to take a smaller branch and twist it into the line and began reeling the line around it. With the tension off the spool, I was able to knock it out of the tree, but after all the trouble it gave us, we decided to keep using the branch to reel in the line.

We took turns as our hands got tired and it felt like the line could break at any moment, but eventually we were able to pull the kite safely to the ground. It was quite a feeling of relief and I decided to not give up on KAP.

The kite-saving experience felt like the ending of the movie Signs where there was enough coincidences to save the day and almost make you believe in a higher power (or Mel Gibson):

  • There was a nature trail through the swamp.
  • The line was snagged in a tree near the trail.
  • There was enough dry, solid land around the tree for us to maneuver.
  • The line was low enough in the tree.
  • I found a long enough branch nearby with a piece sticking out to snag the line.
  • The line didn't break.
  • The tree itself was small enough that the kite didn't get snagged in it as we pulled it down.

Improvements For Next Time

Due to other circumstances, it will be a few weeks before we can get back to the beach. In the meantime, I'll repair and improve the rig before we try again:

  • Better spool and stronger kite line - Before heading home from our first trip, we stopped at a kite store in Cape May and bought a better spool with 500 feet of strong 250lb line.
  • Anchor bag - We also picked up a cloth anchor bag to fill with sand and attach the kite line to so someone doesn't have to hold the spool the entire time the kite is up there.
  • Stronger side bars in the rig - I'd like to still use parts from the VEX kit, but I may have to drill some aluminum instead
  • Metal picavet suspension - Although the wood was light, it doesn't have the strength. I don't know if the suspension wouldn't have broken if the rig didn't hit the ground, but I won't take the chance next time. Like the sidebars, I'll try to use kit parts or else aluminum.
  • Longer strings on the picavet suspension - I used the string lengths specified in the original article for a small rig. They didn't do a good job keeping the rig level and it easily got caught up in the line.
  • Direction indicator - When the rig gets really high, it's hard to tell where its pointing. I'm thinking of painting a straw or chopstick a bright color and attaching it to the rig so it moves with the camera.
  • Lighter batteries - The VEX kit currently uses 6 AA batteries. In the video podcast, they used AAA batteries custom-wired to the rig. Radio Shack also sells a VEX rechargeable battery pack that might be lighter.
  • Attach camera to rig ahead of time - It was a pain in the ass to attach the camera to the rig while the rig was already attached to the picavet suspension and kite line. The cable ties I used were also too sort and I needed to chain two together to wrap all the way around the camera and cradle.
  • Put name and address on the kite - If I lose the kite again and am unable to retrieve it, perhaps someone else will find and return it.
  • Practice with the kite more - I was a little kid when I last flew a kite, and I could use more experience with a large kite. I felt very tense trying to handle the kite at the beach.

Hopefully next time we'll get a lot more great photos.

Future Possible Improvements

When I bought the VEX Robotics Kit, I also picked up the separate programming kit that lets you write small programs and download them to the kit controller. I could write a program that would operate the camera rig without the remote control. It could turn every 10° and take a photo, lower the camera angle a little, repeat the sequence, etc.

If I really get into Kite Aerial Photography and don't mind investing some more money into it, there's even more possibilities:

I used my small 3 megapixel Canon SD110 camera with the rig. There are newer, higher resolution compact cameras available for less than I originally paid for the SD110. If I didn't mind messing with the camera, I could also wire the shutter and zoom buttons directly to the controller. One camera I looked at, the Pentax Optio S6 even has builtin wireless networking. It can be operated remotely from a laptop and can even download photos on the fly. I wonder if its range and battery life are good enough for KAP?

Even if I attach some sort of directional indicator to the rig, it'll still be hard to tell exactly what the camera is looking at. Some advanced KAP rigs have small wireless "spy" video cameras to them. I could see what the rig was pointing at using a cheap portable TV.